Hardware Setup
This page details how to use the network tasks provided by this demo. The first step is to Connect the STR910-EVAL development board to a computer running a WEB browser either directly using a point to point (crossover) cable, or via a hub/router using a standard Ethernet cable.
The jumper marked JP25 must be positioned in the MAC position (across the two pins closest to the marking MAC on the silk screen).
Source Code Organization
Figure 1 highlights the location of the source code files for all network tasks.
Figure 1The lwIP TCP/IP stack is located in
Demo/Common/ethernet/lwIP/v1_3_0.The two network applications running on top of the TCP/IP stack are a simple
web server and a
remote calculator:
- The web server is located in Demo/ARM9_STR91x_IAR/lwipWebServer.
- The remote calculator is located in Demo/ARM9_STR91x_IAR/lwipNetCalc.
The startup code for all network tasks is locate in
Demo/ARM9_STR91x_IAR/net_Launch_srv.c file. Its header file contains some configuration options.
Setting the IP address
The network parameters IP address, Gatway and Subnet Mask, are setted by the constants
emacIPADDRx,
emacGATEWAY_ADDRx and
emacNET_MASKx defined in the file
Demo/ARM9_STR91x_IAR/net_Launch_srv.h as showed below:
The IP addresses used by the WEB browser computer and the prototyping board must be compatible. This can be ensured by making the first three octets of both IP addresses identical. For example, if the WEB browser computer uses IP address 10.52.156.1, then the prototyping board can be given any address in the range 10.52.156.2 to 10.52.156.254 (barring any addresses already present on the network).
If a DHCP server runs in the WEB browser computer, the board IP address can be configured using DHCP by modifying the function
prvEthernetConfigureInterface in the file
Demo/ARM9_STR91x_IAR/net_Launch_srv.c as showed below.
Test the Demo
Now we are ready to start the demo. Build the firmware and flash the board. Please be sure the Java virtual machine version 1.6.0 or greater is installed on the test computer. You can download the installer starting from the
Java web site. When you enter the IP address of the prototyping board in the WEB browser the index.html page is displayed (Fig.2).
At the half bottom there is a simple calculator. It is a Java applet. When the applet is started it is not connected to the board. To start using the calculator press the
On button. When you use the calculator some messages are exchanged between the applet and the board according to the simple protocol defined in the file
Demo/ARM9_STR91x_IAR/lwipNetCalc/NetCalcApp.c.It is possible to monitor the communication by opening the Java console.
I use the Web Server also to display the status of all tasks running in the system. Simply you enter the following address in the WEB browser: http://<BOARD_IP_ADDRESS>/debug.htm
NOTE: Some more recent version of the demo may include more than one statistic pages. Fore example the
debug1.htm shows all task information reported by the
vTaskList API function (Fig.3),
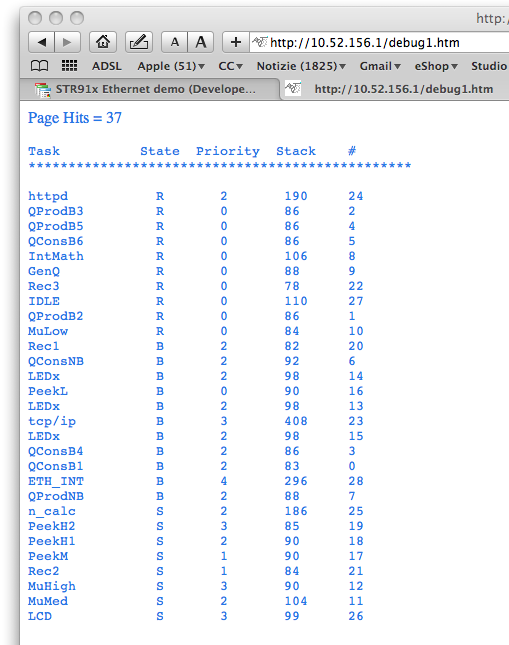 Figure 3
and the
debug2.htm shows all task information reported by the
vTaskGetRunTimeStats API function (Fig.4) .
Figure 4


